Announcement

Collapse
No announcement yet.

DruidFab VA-r

Collapse
X
 
  • Filter
  • Time
  • Show
Clear All
new posts

  • #46
    Originally posted by Muz View Post
    The answer is .. we didnt do projects like this that needed 'em before now .... looks like its verging on robotics .. I'll have to re read that last set of posts about 4 times I think to take it all in

    Why do you need all those solenoids down there ... your Hydrema looks to have a multitude of services in the cab (you've probably explained it and Ive missed it?)
    I did run through it somewhere Muz - don't as where though

    I've one 'spare' 2 way service set for rotate, which is proportional. The breaker is one way and on/off on a button! the other proportional service is switched from the crowd ram - an either/or jobby

    So .... to get control of tilt, rotate (& an aux set) I needed to be able to divert flow to each. To get multiple/simultaneous op. I needed the Cetops.
    Full proportional Cetops would've been nice but at 1200 quid a valve they weren't happening this side of a lottery win !!

    It would also have meant being able to use the breaker as a supply too, but ......... see above

    As it is, I only need a one way proportional supply (which I'm using the rotate service for - one way only) and teh solenoid valve Cetops do all the 'trafffic control', via 6 buttons on the sticks

    There's a lot more to come .............. an' it gets worse!!!!

    Without 3,600 quids-worth (plus VAT) of proportional Cetops, this is as close as I can get to a full 'proprietary' tilty control, with the available resources, funding, knowledge, ability (& cunning), unless I go buy a s/hand one ......... but where's the fun/challenge in that ...........


    .............. An' you'd have now't to read, in this thread at least!!
    If it's got tracks, wheels, t*ts, or an engine, at some point it's gonna give you trouble!!

    Comment


    • #47
      It was heading toward the end of last year by now and the sun didn't stay on my bench too long, that time of year - when it was out, but it had been dry so ....... !!

      Picked up the VA-r on the Miller one morning and swung her side to side, (with a big bar), full tilt, each way, to see what those Tee feed pipes were like - reckoned I could lose three-ish inches out of them and give them an easier life!


      The motor pipes were as tight a fit as you could get without a strike, on full left - had sussed them before, but having put the extra gussets in, it was more luck than judgement, I have to admit, but could always have 'tweaked' the gusset a bit with the old grinder, if necessary!


      And could also swing them forward a tad too, but they were clearing so no need to really!!


      Anyway, Having sussed that it was all going to swing free and clear and it was on the dipper, I just had to see if the old 7 core lead was long enough, as I'd thought it looked a tad short, but my fears were allayed when I strung it out - plenty of slack!!

      If it's got tracks, wheels, t*ts, or an engine, at some point it's gonna give you trouble!!

      Comment


      • #48
        Paul (my friend who had delivered the 'Drema) had suggested to me, putting some rings on the dipper pin ends to keep the flexible bits flexing about the centre of rotation on it, so swung it round and into a bit more of an operating sort of position to have a look see what the routing was like.


        I could put any size I like on the left hand end, but I was restricted to a max 70mm OD on the right (live) end, to be able to pull the pin, if I ever need to.

        The left side was a doddle with the cable & pipe routing and the only real question was the orientation of the ring on the pin end, so as not to give the pipe too hard a life.
        Had a look at Paul's DaeWoo thread to see if there were any pix of his on there ! They were in a slightly different place to what I had anticipated though, so stuck with my initial idea.

        From there it routed nicely between the Miller and the VA ram brackets and around to the 'T' QC in the pivot pin. Thought It might be useful to just secure the pipe to the Miller lift eye to keep it put, or perhaps even pass it through the eye. I would still have an eye to use on the VA-r top bracket


        I think I favor a re-usable chunky tie, with the pipe on top of the eye; Certainly with these pipes at least, which are off the grab.

        These were seriously python like and I may well invest in some dedicated hoses for the VA, with perhaps doing away with the QCs at the pivot pins and piping direct from them, either to some QCs located either side at the rear of the upper, or have the dedicated pipes long enough to fly 'em up to the QCs at the dipper.


        Slight issue with the latter was that the QCs on the dipper were some weird screw fittings that looked (a) like they may be hard to find/replicate and (b) 'kin expensive, if I can find some more of them!!
        OE fits from 'Drema for their grab (and they're a bitch to use)!!
        If I robbed them off the grab pipes, I'd have to keep swapping them back, if I want to use the grab!! (a right PITA)!!

        Or;

        I swapped the QCs on the dipper, for 1/2" flats, acquire dedicated pipes, fit them with flats for the VA, swap the grab pipes over to flats too and stash the 'Drema QCs into 'stock'! (be a damned sight easier to use too)!!


        The right hand side was a different story for routing with the grab pipe and is yet another 'argument' in favor of some dedicated pipes!


        All the cable ties on the VA ram plumbing in the pix, were temp.s, as I was waiting for some stainless ones to turn up, which with some suitable protective sleeving over them, should do a fair job of keeping those pipes put, on the ram cylinders. Similarly I was awaiting the arrival of some pipe clamps to keep everything in place down the brackets.

        I was also considering running the cable inside some protective casing, perhaps a rubber pipe, to again keep it as safe as poss from chafing/trapping/etc..

        A couple of cosmetic additions also arrived for it in the form of some end caps to plug up the spare holes in the body - just to give it a bit better 'look' and try to keep anything from straying in through the holes they plugged !


        I thought it looked better with them holes plugged up, eh?


        Also delivered that day was a letter from Parcelfarce asking for money for the ......... duty on the
        Roemheld, which had arrived from America!!
        Didn't want to open it, for fear of the extra duty cost, but was pleasantly surprised when I did!!

        It was in Newport sorting office and would hopefully be delivered the following day, having paid the extra that evening.

        Zero duty, £24.20 VAT and an eight quid fee for the pleasure of paying them - result!!

        Talking to the posty about it, he said December was the best time of year to import anything like this, as they are so swamped, loads of stuff just gets 'waved through', with barely a cursory glance - Faultless!!
        One very happy Druid !!!


        Bit PO-ed that this was not the item shown in the listing, but a.n.other,not quite so pristine item as the one pictured. Looked like it had been rolling round a floor somewhere, when I got it out the box, before cleaning it up for its 'photoshoot' ! Quite a few battle scars/dings/gouges in it !!!!!!!


        I thought - It had better be oil tight, although must admit, not much in the way of signs of leakages, least not to atmosphere anyway!!!

        It was a cute lil' puppy though - just as spec.-ed, dimensionally and'll drop in a treat.


        I was deffo going to have to shorten up those VA ram tee feed pipes to keep them up a bit from where they were and away from this lil' fella. More head scratching and careful measuring required ................ and then I had to make make this one fit !!!
        If it's got tracks, wheels, t*ts, or an engine, at some point it's gonna give you trouble!!

        Comment


        • #49
          The plumbing 'P' clips eventually arrived and the stainless cable ties to secure the pipes to the ram cylinders, suitably sleeved up.


          Few more 'P' clips than I needed, but they'll come in handy I'm sure!!

          The stainless ties use a ball grip system to hold them tight!!

          I was almost certainly going to need a pressure reducer/flow control reg. for the VA 'P' supply to enable me to set it up for max. travel pedal = as fast as I want it to op.!
          Don't want to be having to feather the pedal between 0 and 1 - 0 to 10 is much more controllable!! The pedals are some bit fierce on her.

          There were two main contenders in the running for the job -

          This one - http://www.flowfitonline.com/acatalo...CHECK_347.html

          or this one - http://www.flowfitonline.com/acatalo...CHECK_344.html


          The latter looks a neater job for where I wanted to put it on the input of the VA-r back swivel pin here, between the elbow and the QC, or the pipe, if I went for a dedicated set of pipes for it, which was almost certainly on the cards!


          or here, in-board, between the pin and the swivel union, but it might have meant having to shorten the 'P' feed pipe to the Cetops to accommodate the extra length of the valve and a. n. other adapter!! Do-able but a PITA - got to get the pipe re-made/ended!


          I thought my preference was the first option, on the position and probably the barrel type is the neatest and least likely to get damaged.

          The tap would be an easier adjust, but the barrel is neat/compact, for where it's likely to go.

          Managed to get a little bit done between the monsoon conditions that prevailed for a while.

          I Had made up some removable rings for the pipe capture/routing, as per Paul's suggestion, a while back and had been meaning to get them 'in situ' for a while.

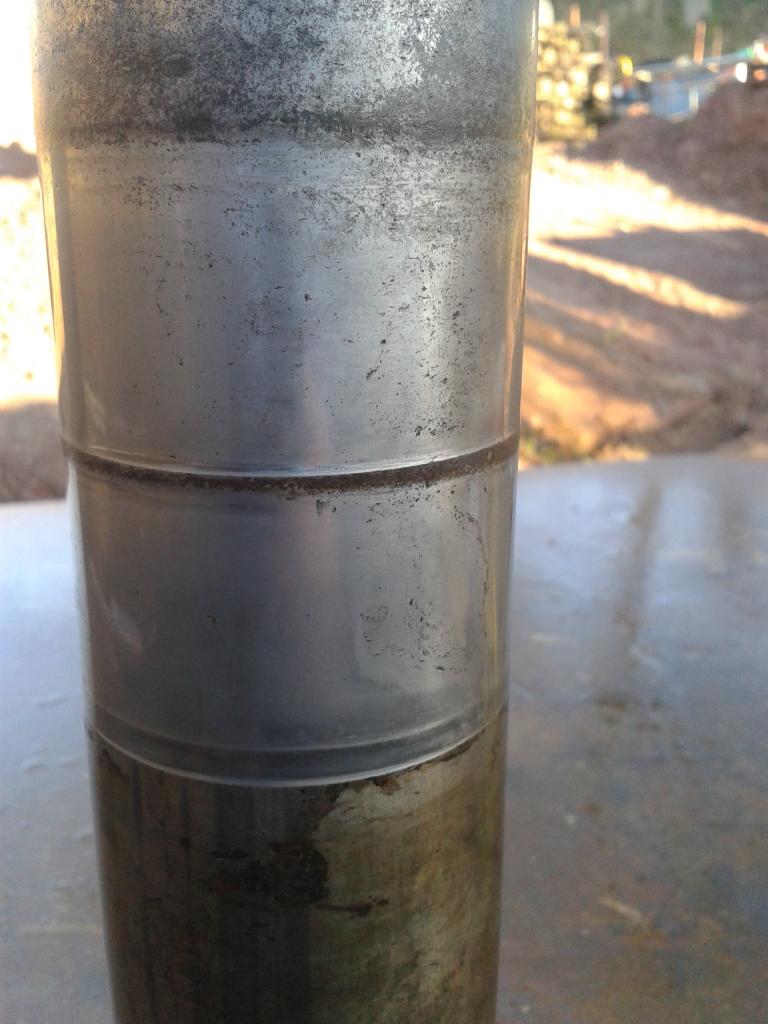
          Having pulled the dipper end pin out of the 'Drema, to weld the ring mounts to and discovered the wear, I thought it prudent to replace it with a new pin.


          top end


          Bottom end as as stood on the bench


          Down to an average of 69 .3mm from the original 70 and looks a lot more!!

          So the rings got welded to a new one, ........


          ............. before going back into the dipper end.


          Having cleaned/emery-ed up, greased & persuaded the new pin back in - (that Miller is bloody heavy!!)


          I thought I'd have a look at the tip link pin too!!


          not quite in such a bad way but a candidate for replacement too .....


          Made sense, as I have several new pins made up and these'd do for bucket pick ups. They're all captured in the bosses, so very little wear at the ends and were unlikely to give the bosses any grief.

          Plenty of grease in 'em (which took some wiping off to get some pix), so not really down to lack of lube, just general usage/wear and tear!!

          New pins were fairly tight in the bushes going in, so no real cause for concern there and it's all tightened up significantly.

          Set the rings at a 'mean average' of where I reckoned they'd need to be, but as they're fitted into a captive nut each end of the pin and have a lock nut, they're fairly adjustable, if necessary - time will tell on that one!


          Bit of a finish off with some 'Druid Gold' ..........


          ..........and refit the capture nuts to keep the lil' bu**ers put!!!!!!!!

          Obviously the rings are completely removable if you don't want 'em on - just pop some plugs in the nuts to keep the tish at bay!!
          If it's got tracks, wheels, t*ts, or an engine, at some point it's gonna give you trouble!!

          Comment


          • #50
            Graeme this is quite the thread and I can't wait to see that tilt-rotator in action. I used an Indexator rototilt about 4 years ago on a New Holland 5 tonner and loved using it but it didn't have hydraulics or electrics to the bottom end of the attachment as it was only used for digging related work. I have also used regular tilt buckets in my day to day work or at least when I do have day to day work. I hope your able to make a few videos for us when it's ready for some digging and material handling.

            Comment


            • #51
              Originally posted by 245dlc View Post
              Graeme this is quite the thread and I can't wait to see that tilt-rotator in action. I used an Indexator rototilt about 4 years ago on a New Holland 5 tonner and loved using it but it didn't have hydraulics or electrics to the bottom end of the attachment as it was only used for digging related work. I have also used regular tilt buckets in my day to day work or at least when I do have day to day work. I hope your able to make a few videos for us when it's ready for some digging and material handling.
              Evening Bert............ it's been quite the challenge too mate

              You very nearly had your wish granted today, but didn't get as far as anticipated with what I was doing

              Never having used or even seen a tilty, in the metal I can only assume from reading of everyone elses exploits with 'em that they're ..... ............ 'Kin good . Certainly looking forward to what I hope to be able to achieve with mine!

              Having gone to all the effort so far, it had to have a rotary for fluid potential 'down below'.
              The hitch creation is going to be yet another 'challenge' and one that I've so far not gotten started on!! - all in the fullness of time ...... having gotten used to 'a hitch on a switch', I gotta have it below too!!
              If it's got tracks, wheels, t*ts, or an engine, at some point it's gonna give you trouble!!

              Comment


              • #52
                Oh boy what a thread - just read it end to end and I doff my cap to you sir !


                I do wish that I had your steady hand with that gas axe - some superb cutting there :)

                Comment


                • #53
                  I had had the rotary coupling for a few weeks, but the weather had conspired against me making any progress, with getting it installed. One morning the sun was out, not a cloud in the sky and I was determined to get the Roemheld into the VA-r !!!!!

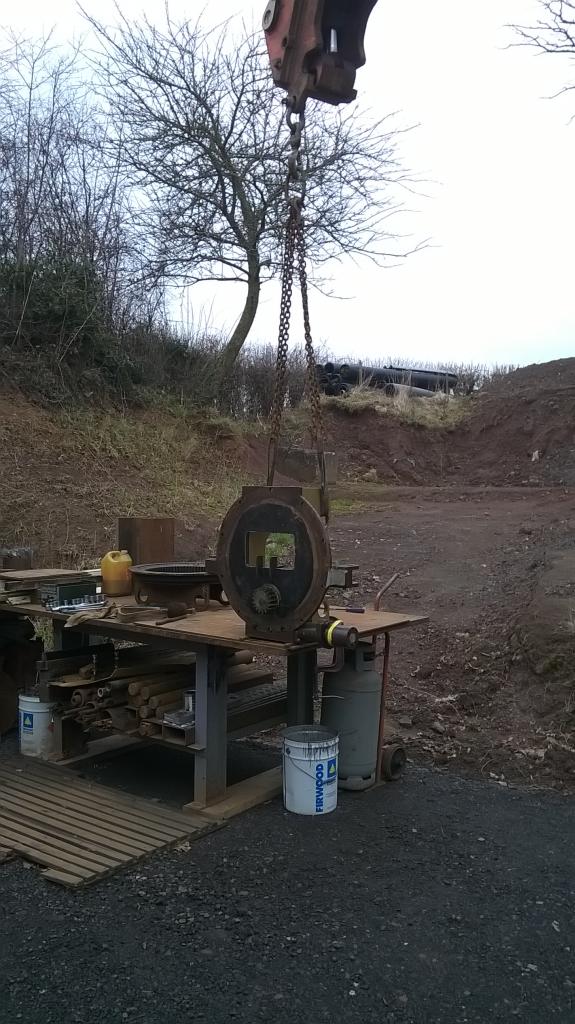
                  So....... slung it on the bench whipped out the 16 bolts holding the ring gear to the bottom pick up's mount plate, picked the top off and stuck it out the way!


                  leaving me with this ........


                  Now the centre point on the base plate was marked into it originally when it was first made, so no prob.s finding the centre of rotation. The issue was that it was on the side with the pick ups on !!!!

                  So, the grinder came out and I detached the mounts from the base plate, that'd tacked on for its trip to Raglan, a while back!

                  As the centre datum was going to get removed for ever, I thought some extra datum marks would be in order for any future alterations that might occur, so set out several points of reference, before putting a 1/16th inch drill through the plate to transfer the centre mark to the other (top) side !


                  I got 90 and 45 deg ctr. lines and a 200mm PCD marked up, before flipping it over and repeating the process on the top side, plus an 85mm hole for the upper part of the rotary coupling and a 96mm for the side fitting notches, to clear the plugs.

                  Suitably marked up and datum pointed, it got set about with the gas axe!!


                  Followed by a clean off with my ol' mate the 5" grinder


                  Followed by a bit of a trial fit of the Roemheld rotary coupling


                  As a well known Trotter would say "luverly jubbly"!!

                  I was considering extending the small notches, to accommodate the port plugs, in the side of the Roemheld's upper, to possibly cater for some 90 deg. fittings, which would effectively bring the fluids out flush with the underside of the mount plate, as low as possible and also give more width between the ports, than the top ports would allow - jury is still out on that and will have reached a verdict, after a night's kip!!


                  Tomorrow was not going to be another day, like that one looking at the forecast, that night - wasn't going be quite the azure skies !!

                  I was hoping that, with the top back on the VA-r, the rotary was going to just clear everything , as was, otherwise everything was going to have come apart.

                  I was also waiting for a TCT cutter to appear in the posty's sticky mitts, to make a bracket to mount the upper section of the rotary to the lower mount plate - It had to be a perfect hole, as the tolerance between it and the mounting holes is tight, as you can see below !!


                  Had to get this in, plumbed up, alter the tilt T pipes, then I could oil it up and put everyone on the UK forum out of their misery/suspense!!!!!!!!
                  Plus I wanted to use it - the jobs were mounting up and att.s were going to get pinned on initially, until I could get a Druidfab hitch assembled (in the metal - it's already sorted in the head !!

                  Well the forecasters weren't wrong and it was brass monkeys!!

                  Had a busy morning on other 'duties' and there wasn't a lot left of the day !!

                  Lifted the VA-r upper back onto the lower plate and got a few bolts in to line it all up, to see just how tight it was going to be - OMG!
                  An Initial squint said - no way José !!!!!!
                  If it's got tracks, wheels, t*ts, or an engine, at some point it's gonna give you trouble!!

                  Comment


                  • #54


                    After the initial oh shit!! / panic / disbelief / ... I couldn't really be that far out - could I ? thoughts and a bit of a more careful assessment with a square, I concluded it was going to be an FT fit!!!

                    Dropped all the plumbing off the upper, and set to all the cable ties, etc., holding everything in place. Disconnected the tilt ram pins / unplugged the loom and took the weight, ready to pull the main swivel pins .......


                    and off came the upper for the first time in months and hopefully the last time in a while!!

                    Swung it over to the other bench and ratcheted it down, as it's a bit on the top heavy side with the tilt rams still in place!!


                    Daylight was now fading fast!!!!!!


                    As I set about gutting out the lower section of its contents!!

                    Whipped the motor pipes off and out came the Cetop manifold, pipes, etc., after I'd managed to get the two SHCSs out of it - don't recall 'em being that much of a struggle going in, but then they weren't surrounded by plumbing etc., then!!


                    With a bit more 'breathing/viewing space' I could have yet another 'better' assessment of the available 'slot' for the Roemheld - not the best, but I was reasonably confident it'd go in there!! (with a bit of Druidry!!)


                    Doesn't take long to get so much stuff spread about in one small place and seems to take an inordinate amount of time to put it all away,when you've had 'the ten minute warning' from the boss that tea is nearly ready!!!!!!!!


                    Weather was set to be the same the following day, but at least it was dry and you can keep warm by working faster!

                    The top assembly had to come off the ring gear the next day, for some serious metal removal to the bare minimum - then back on and decide whether it would work/fit, or have a re-think - I did have one idea already, if I couldn't make it happen, but really didn't want to go down the only alternative route I could think of, if I could absolutely avoid it!!!!!!
                    The next day was all mine - I was going to turn the phones off and lock the gates!!!!!
                    If it's got tracks, wheels, t*ts, or an engine, at some point it's gonna give you trouble!!

                    Comment


                    • #55
                      Had a busy-ish day, again, on this bit -
                      First thing on the agenda was a proper suss of available space!!


                      Just about I reckoned - just!!!!

                      closely followed by the removal of the loom, which entailed the removal of the drive cover, as it's fixed to it from the underside ....


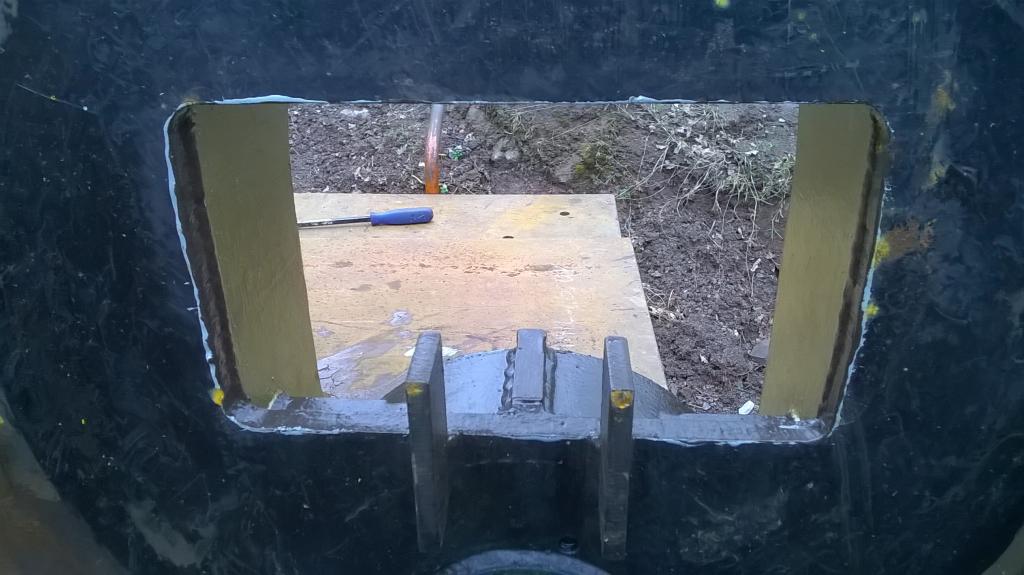
                      next was to get it air-borne and stand it up where I could get at the offending extraneous metal !!


                      clamped into spot, I could drop the 'Drema off it and set to!!

                      this lot had to come off to make this aperture as deep as I could ......
                      If it's got tracks, wheels, t*ts, or an engine, at some point it's gonna give you trouble!!

                      Comment


                      • #56


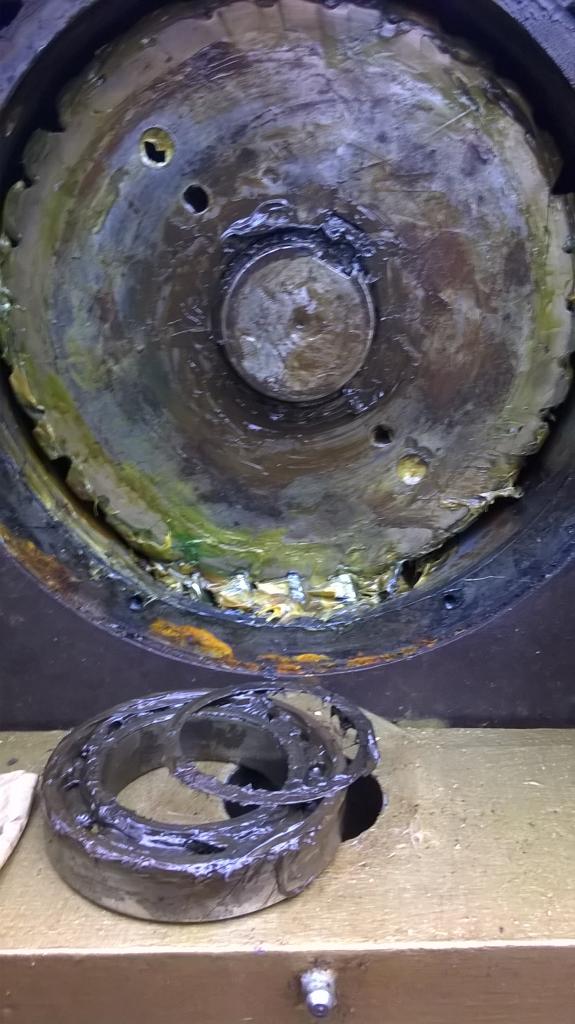
                        However, there was an awful lot of real sticky, claggy grease in there ......


                        Which was not going to bode well for all the grinding shards I was gonna produce getting to where I wanted to be!!!!

                        So........I thought, righty ho, let's see what's involved in removing the really greasy bits, as I've never been fully in there anyway, it wouldn't hurt to give it a good clean and repack


                        top plate carrier bearing came off without too much fuss and had a bit of a scrape out.

                        The drive cog was relatively mobile with a gentle tush, but knew it was not coming out with the worm in place, due to the way it's machined to shape, to follow the worm's thread!


                        so............

                        What the hell - it would not hurt to strip the lot, clean it all and reassemble with a new grease pack - I'd at least know for sure in my own mind that it was all in order - plus I'd not have the worry of any contamination either and know exactly what I'm dealing with in future!!

                        Motor came off with a bit of 'jiggling', followed by the extension tube!


                        leaving me with a floating worm shaft ......


                        ........ which allowed enough tolerance to pull the drive cog, that came off sweet as a nut, due to the foresight of proper engineers putting two holes into it to pull with !!

                        a few minutes later and it's on the bench.......


                        leaving the pinon shaft and lots of grease behind


                        now then - at some point in this thing's previous existence, prior to its re-incarnation as a Druidfab VA-r, this unit's had a bit of a cat'safterme befall it, that, or a motor failure and they couldn't get a direct replacement.

                        The housing for the motor extension tube has a 'defunct' thread in it ....


                        And a pointed grub screw, that there's no sign of externally!!
                        Said extension tube has been fabricated up (and is a bit 'rough round the edges'), but not a bad job, per se - certainly functional!!


                        What's more, the motor drive extension is similarly 'assembled' to take, presumably a non OE motor, again a bit so so!!
                        If it's got tracks, wheels, t*ts, or an engine, at some point it's gonna give you trouble!!

                        Comment


                        • #57


                          Appeared that the stores were clean out of 'grub screws' the day it went together !!!!!

                          Having looked at this briefly (and it was going to get some serious scrutiny later), it may just be possible to shorten this up, possibly considerably, but I had to wait 'til all was re-assembled, to see just how much by and how much is practical???????

                          having cleaned off the drive cog a bit .........


                          I also found signs of a previous encounter with something extraneous at some point in its past too !! A little fettling was going to be in order before it got re-assembled, I think!!!!


                          Interesting cog - cast (steel at a guess) centre with a phosphor bronze tooth set, bronze arc welded to the centre hub - not a cheap way to produce this item!!


                          I then returned my attentions to the ring gear pinion, still sat in place


                          I eventually sussed that although it would tap out so far with little effort from the copper hammer, to a certain point, something wasn't allowing it any further - no visible circlip????
                          Then found a 'set up' that was rather clever, sneaky, but clever.

                          Square section clip with a machined cup over it, partially retaining it and providing a bearing surface for the drive cog to mate against!! Forgot a pic - even with all the grease wiped off, it took some spotting and have not seen it done before !!

                          Anyway- slipped the lil' devil off, followed by said clip and the spigot shaft gently tapped out, sweet as...., as did the bearing in the opposite direction, leaving me with a lot of cleaning to do, to eventually arrive at this .........


                          A clean, dry, bare casing to set about with the grinder.
                          Gas axe is out of the question - do not want to put too much heat anywhere near the drive housing!!!!!

                          Used up the rest of the remaining daylight, that day, cleaning off the ring gear and various bits, before tucking 'em up for the night on a shelf, in the dry!!


                          And that guys, is yer lot for tonight !!!!!!!
                          If it's got tracks, wheels, t*ts, or an engine, at some point it's gonna give you trouble!!

                          Comment


                          • #58
                            Graeme, not trying to go to far off topic here but with the powers that be in the sky and you working on this fantastic project in the outdoors have you ever considered constructing a shelter to at least keep your dry if not buying a shelter something like this?


                            http://www.diamondshelters.net/index...&id=4&Itemid=6

                            Comment


                            • #59
                              Originally posted by 245dlc View Post
                              Graeme, not trying to go to far off topic here but with the powers that be in the sky and you working on this fantastic project in the outdoors have you ever considered constructing a shelter to at least keep your dry if not buying a shelter something like this?


                              http://www.diamondshelters.net/index...&id=4&Itemid=6

                              Hi Bert, They're some great units those, but bet they're great prices too, as in great big prices!!

                              Very nice and being temporary, no planning required. I intend to build myself a workshop eventually about 40' x 45', but am having to dig out a bank to achieve enough flat ground to put it on.

                              The problem with some sort of cover is everything's heavy and I need to be able to get at it with the 'Drema to lift it about
                              Outdoor working is not ideal and very weather dependent, which in the UK is a PITA!
                              Currently no choice though, but I do like those 'tents'

                              Any idea what sort of money they run at?
                              http://www.diamondshelters.net/index...&id=6&Itemid=9
                              second one down looks mega and could get a 'Drema in there
                              If it's got tracks, wheels, t*ts, or an engine, at some point it's gonna give you trouble!!

                              Comment


                              • #60
                                A pair of 40 foot containers one on top of the other each side of a central space and you can span them with a beefy universal beam for lifting and pop a truss roof over, and you have a ready made workshop. Cut openings into the sides of the lower containers for a machine shop and use the upper ones as storage - sorted :)

                                Carry on digging into your bank and no-one would know it was there !

                                Comment

                                Working...
                                X